Logging in WooCommerce
WooCommerce has its own robust system for logging, which can be used for debugging during development, catching errors on production, or even sending notifications when specific events occur. By default, WooCommerce uses this logger to record errors, warnings, and other notices that may be useful for troubleshooting problems with a store. Many extensions for WooCommerce also make use of the logger for similar purposes.
Viewing logs
You can view the entries created by the logger by going to WooCommerce > Status > Logs. The log viewing interface depends on which log storage method is configured (see the “Configuring the logger” section below).
File system
With the default file system storage method, the first thing you will see is the list of existing log files:
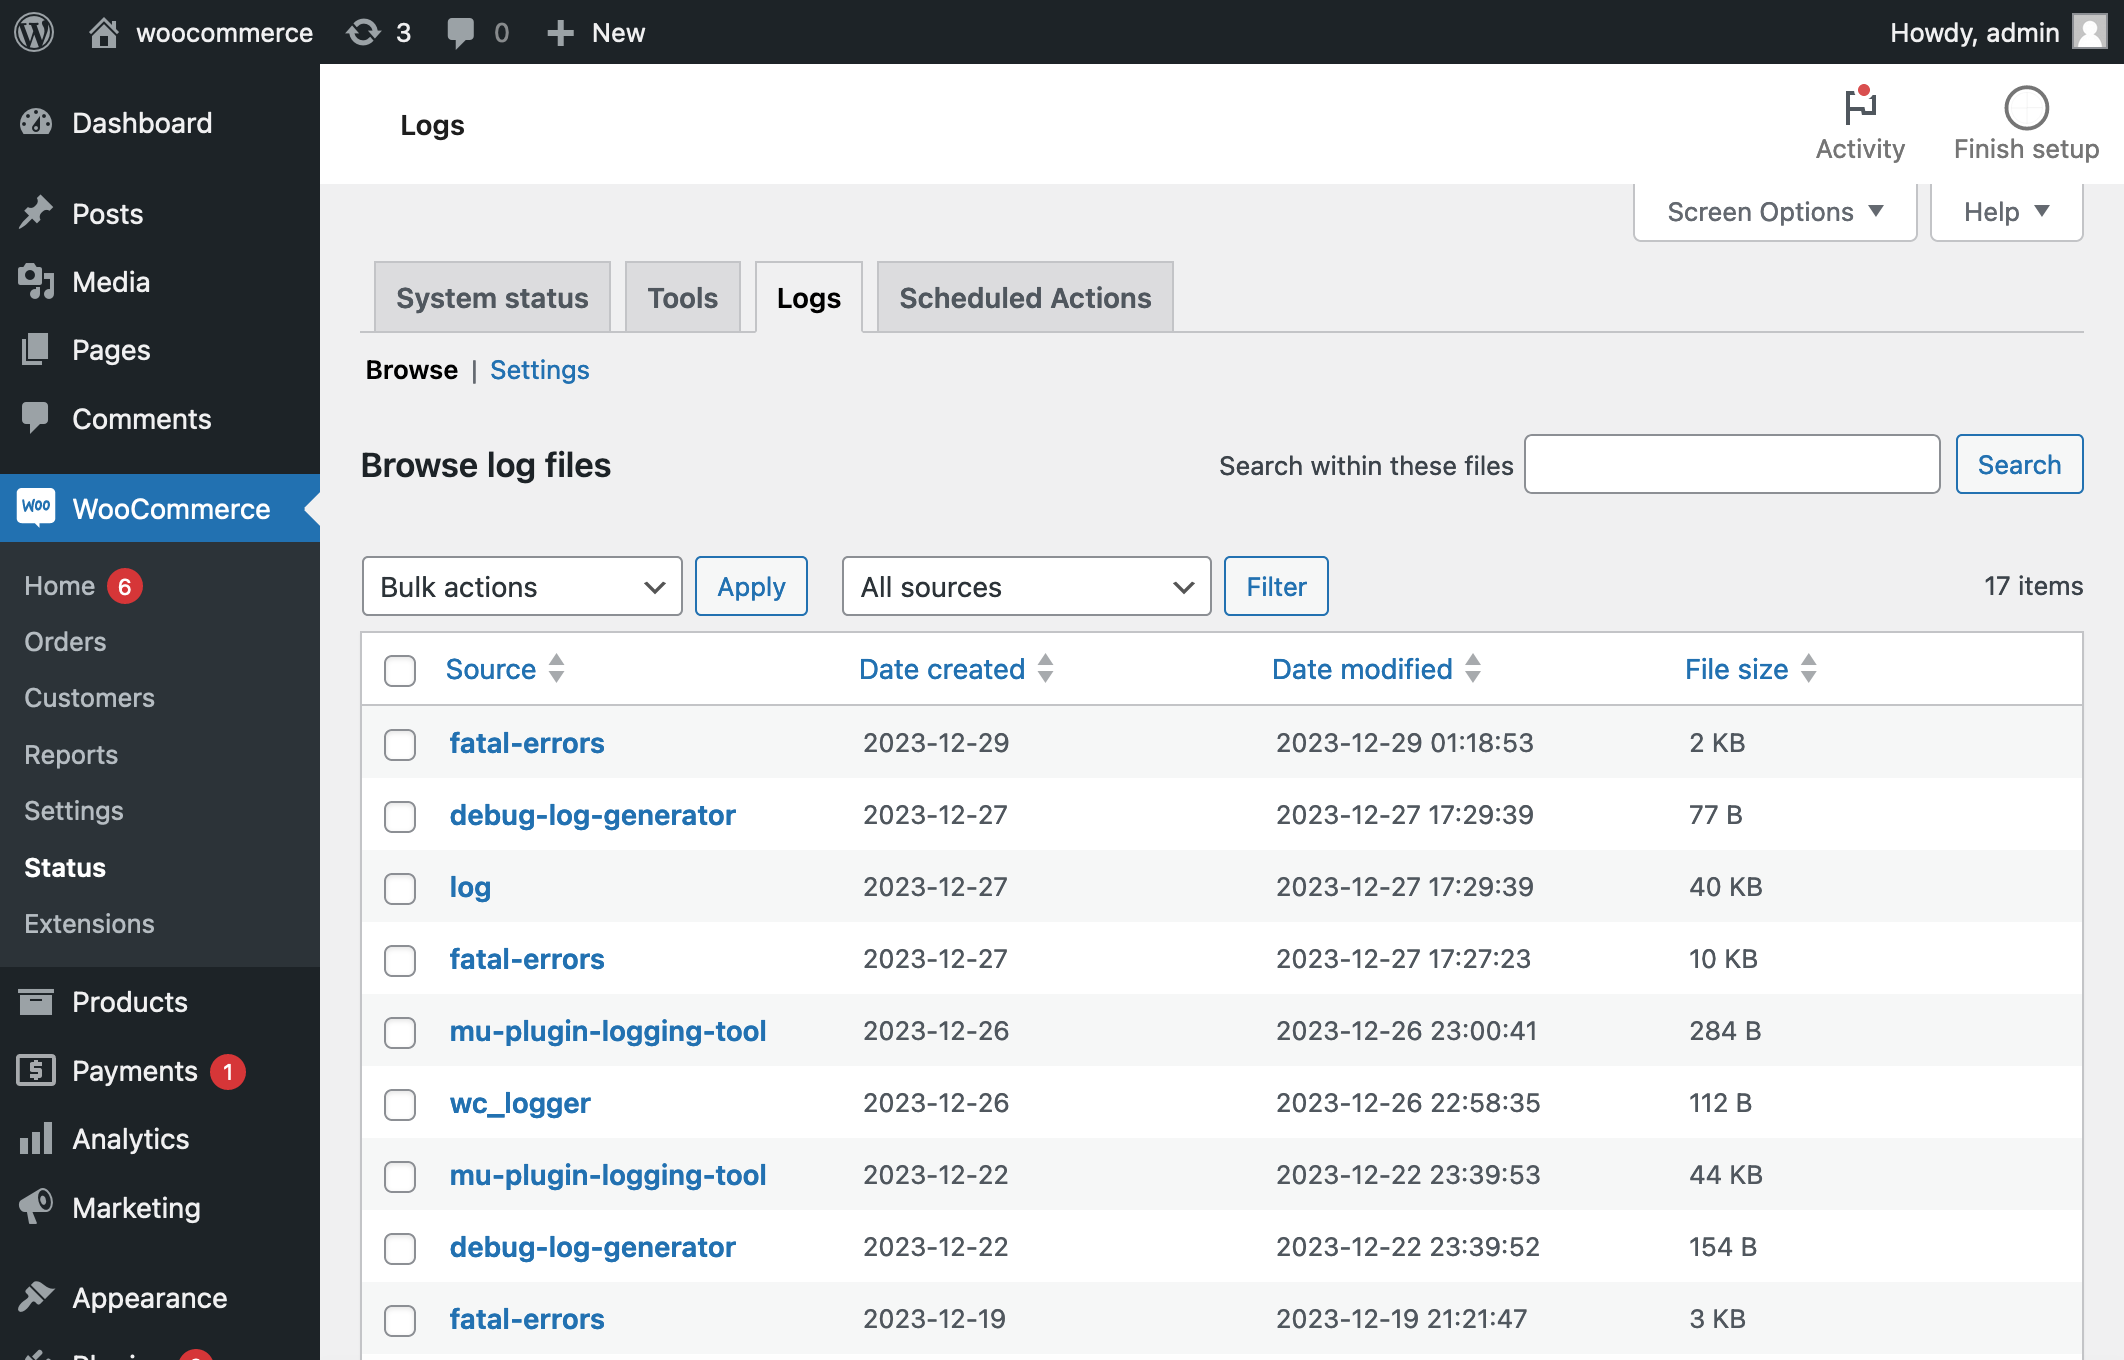
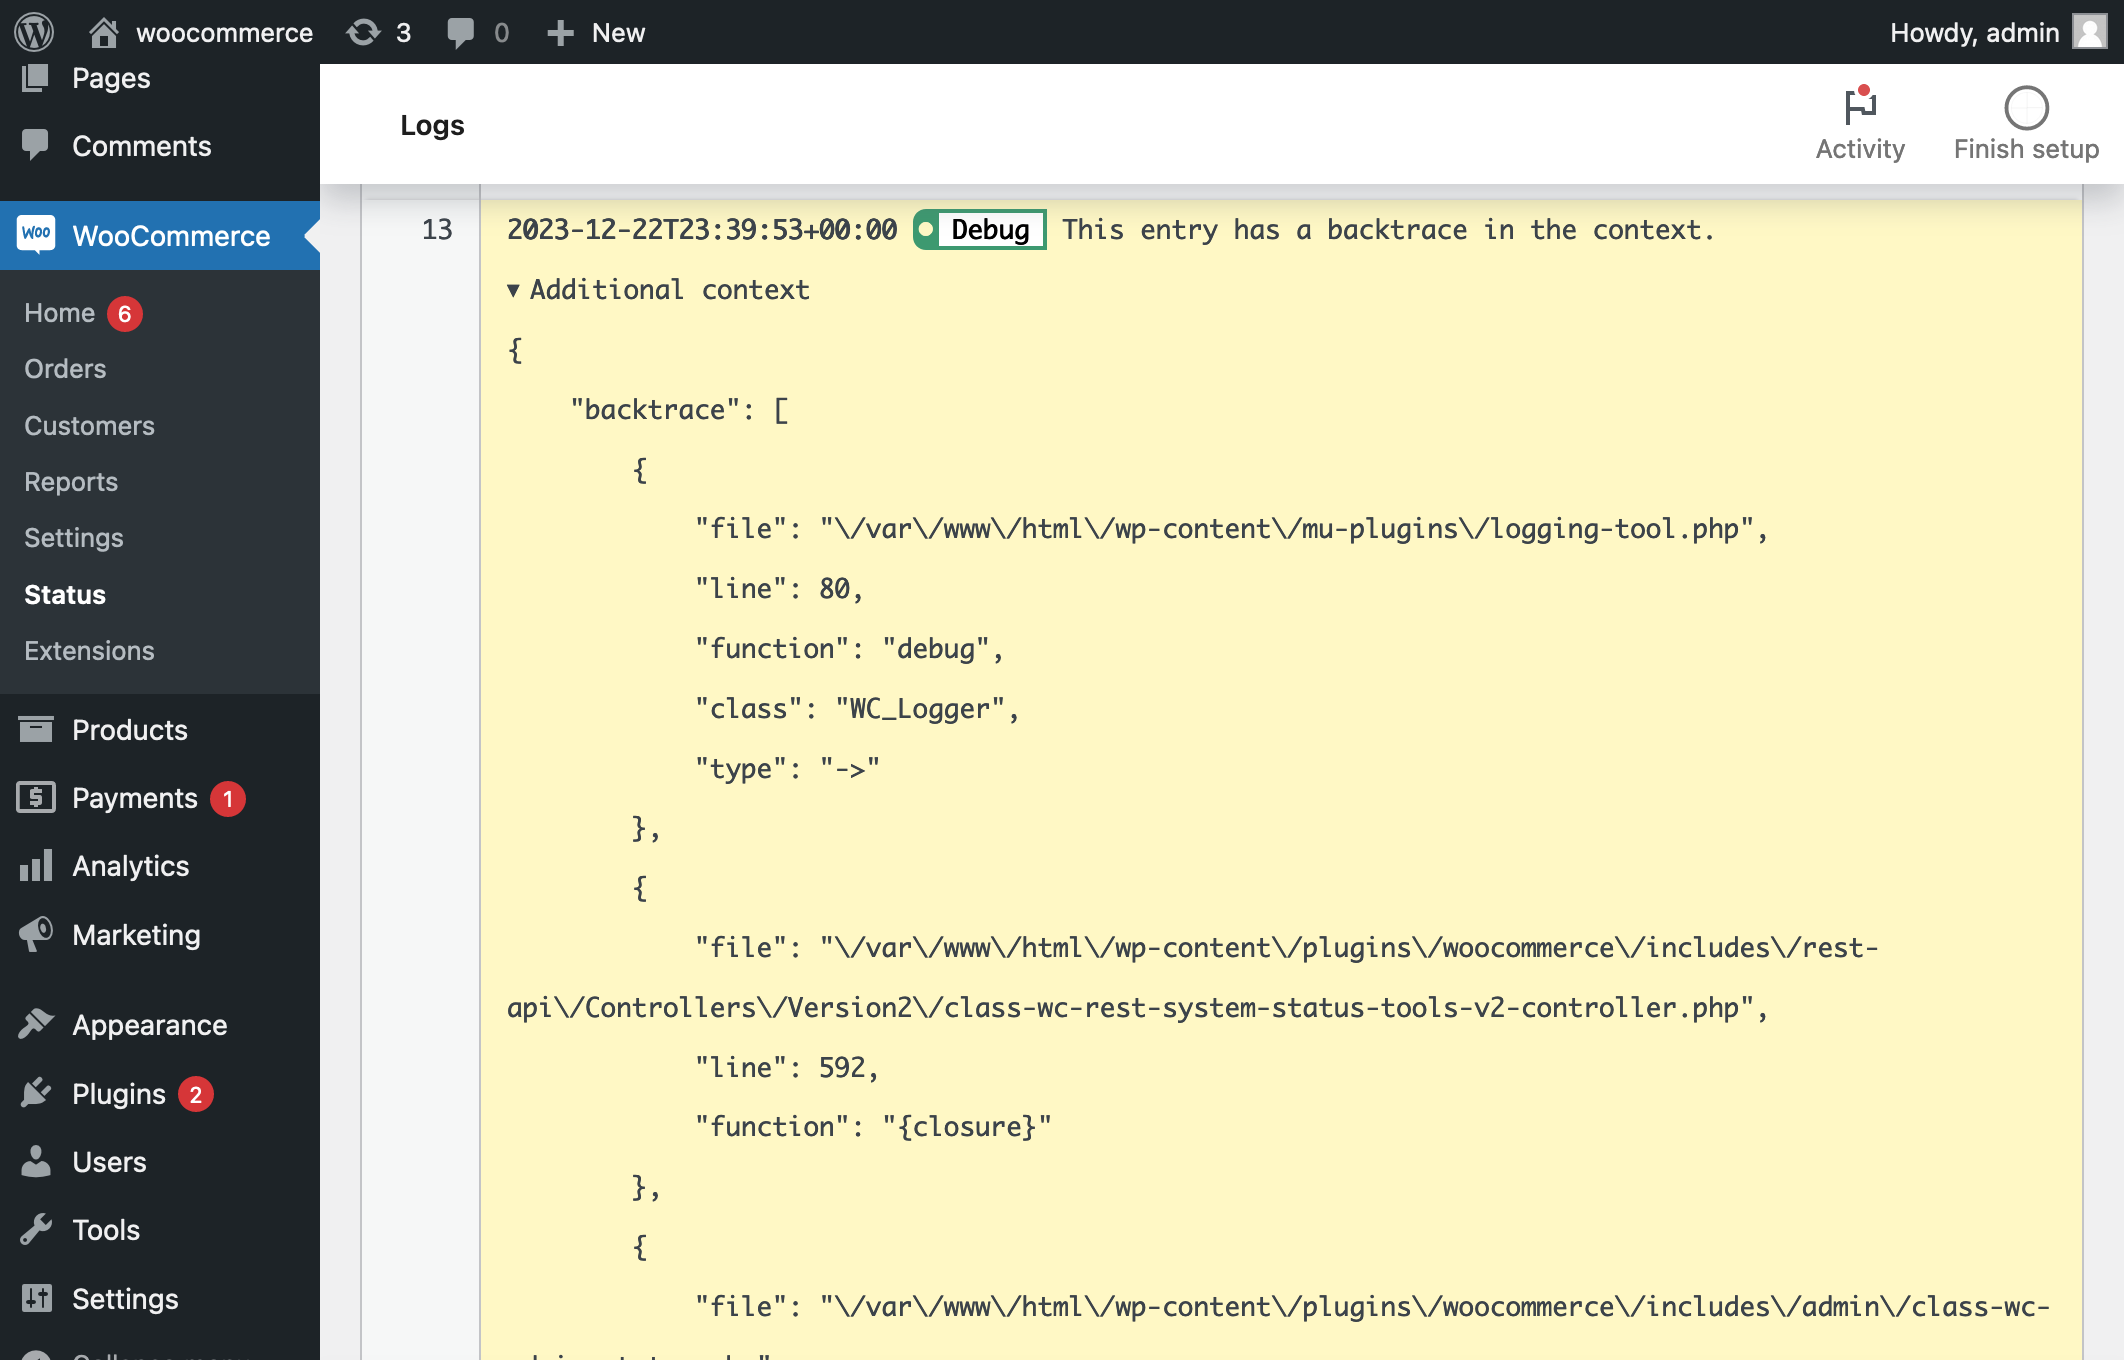
The name of a log file is based on the source of the entries it contains (meaning the extension or the part of the WooCommerce codebase), as well as the date the entries were generated. In this file browsing view, you can sort the files in different ways as well as filtering them to show only those from a specific source. Clicking on a file will take you to a single file view, where you can see the actual log entries:
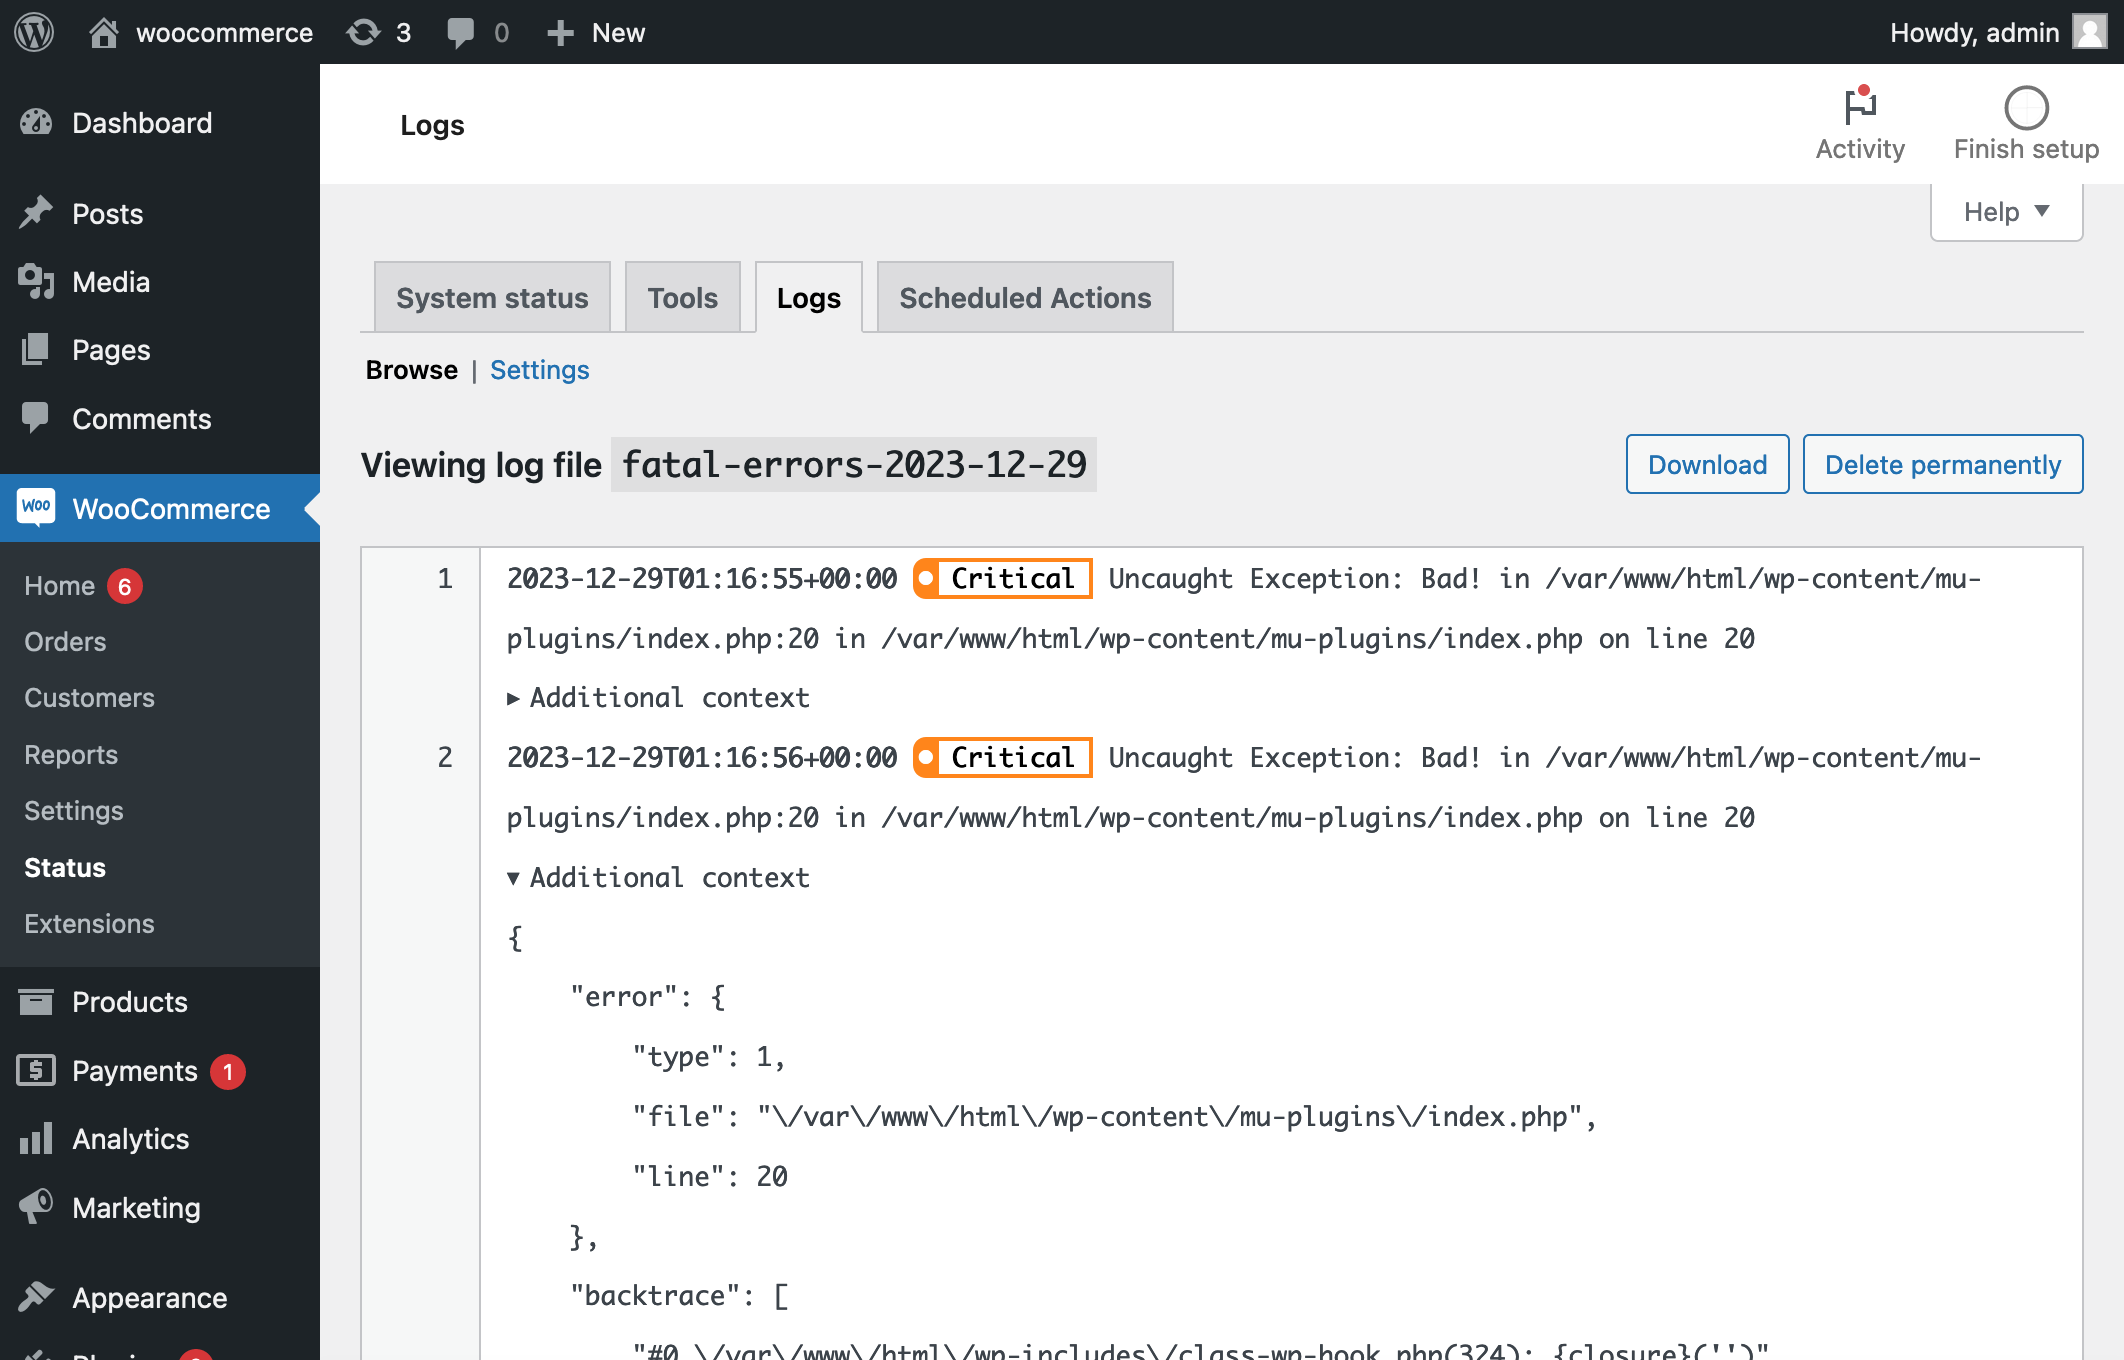
Click on a line number in the file to highlight it. This can also be used to link to a specific line in a file from elsewhere.
From the file browser view, you can sort and filter a list of log files, and then search for a string within the contents of those files:
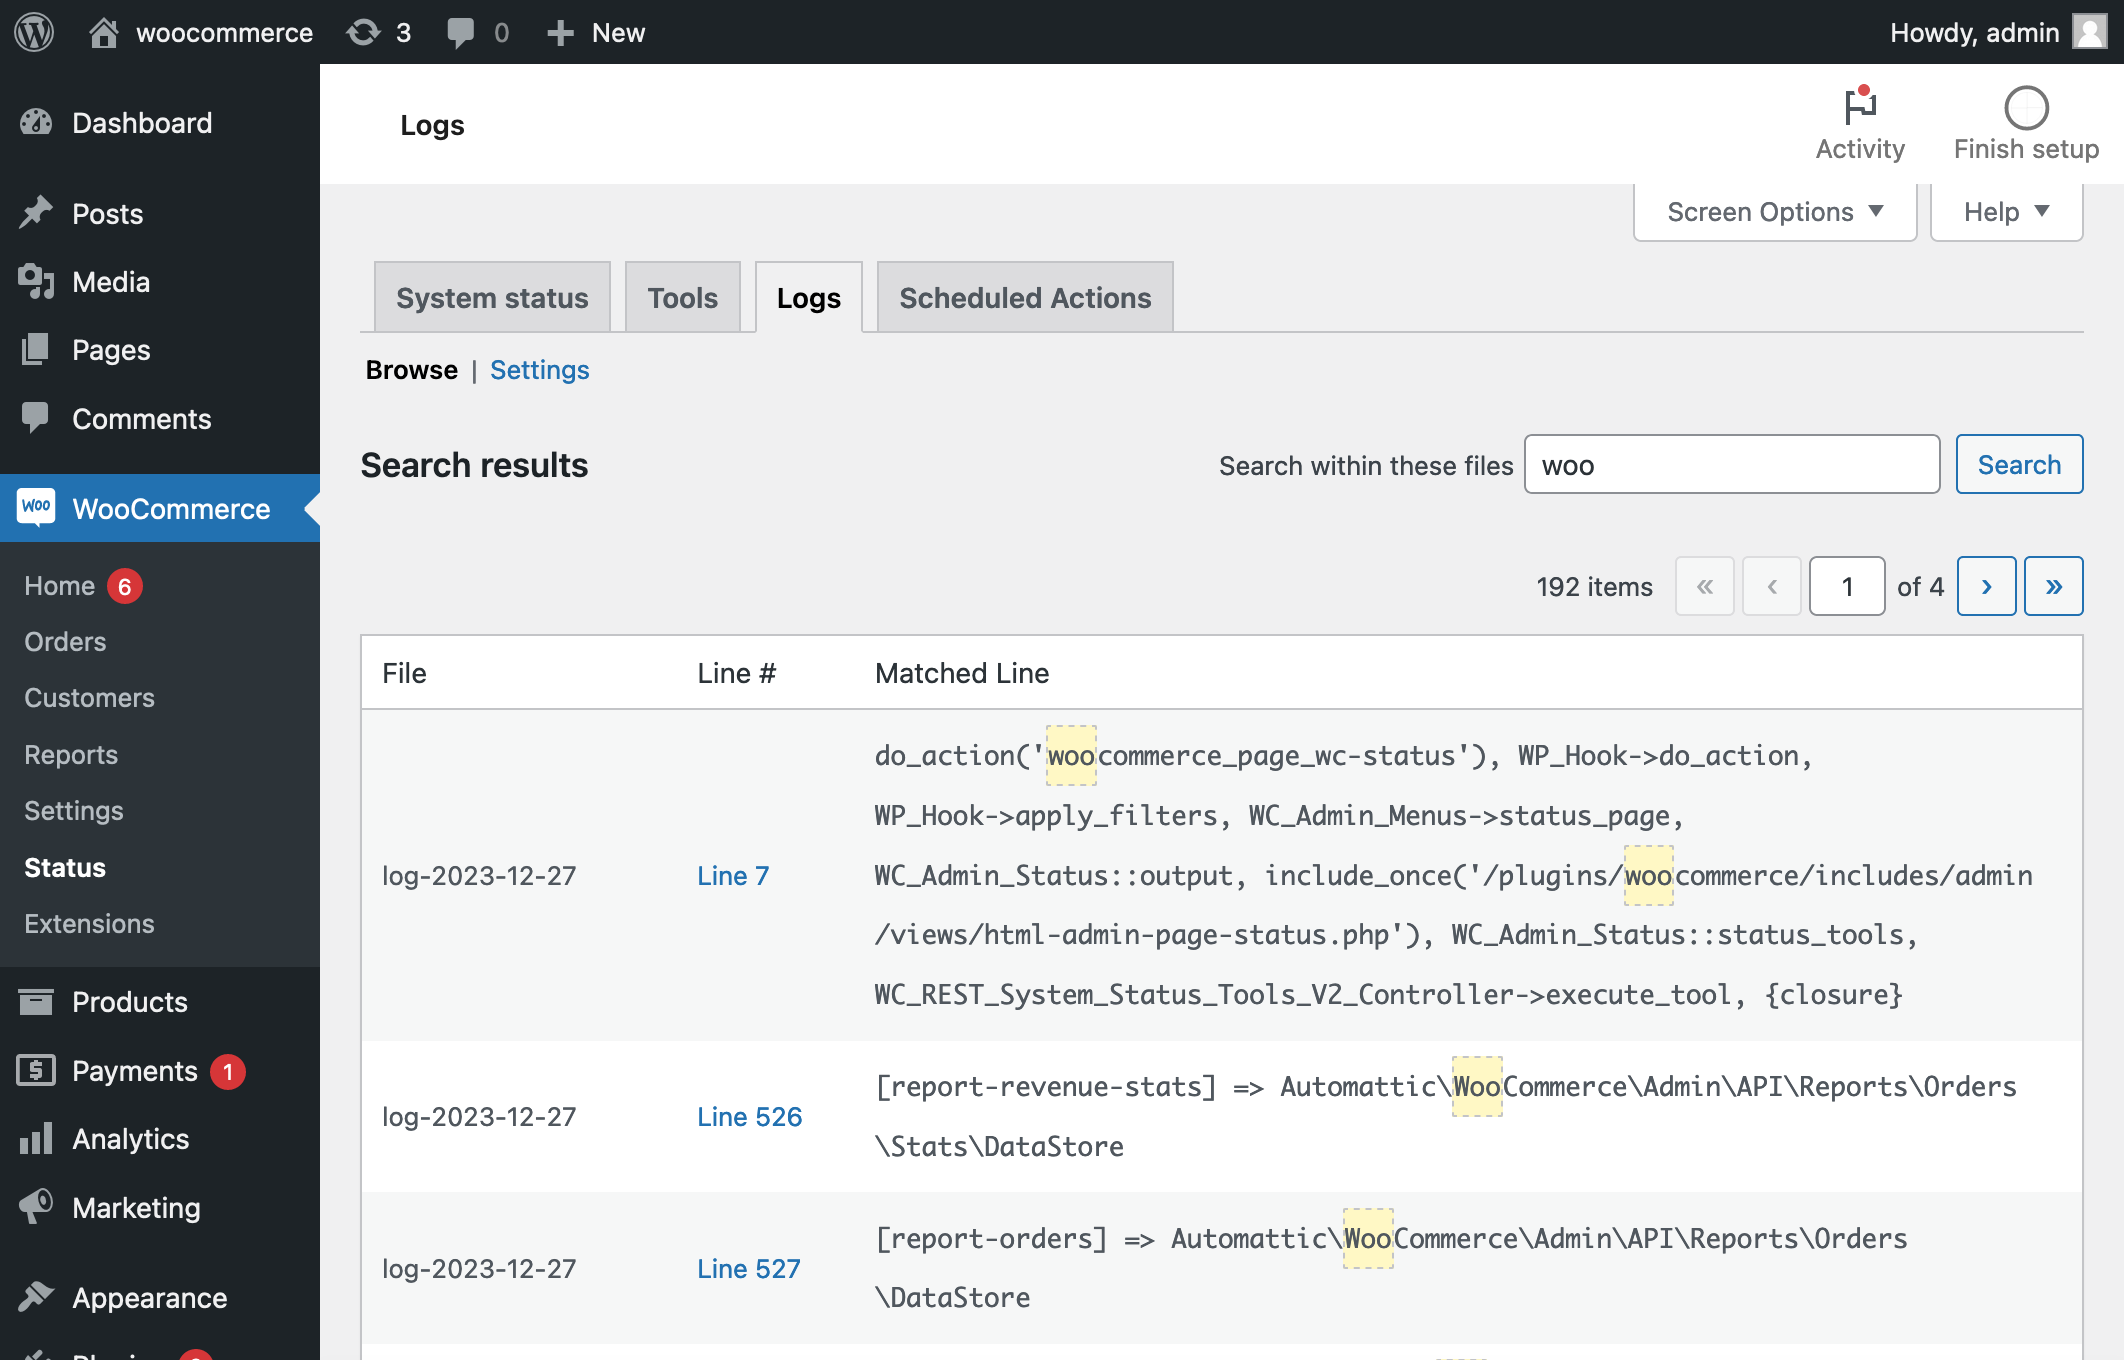
Clicking on a search result line number will take you to that line in the single file view.
Database
With the database storage method, you will see a list of log entries, starting with the most recent:
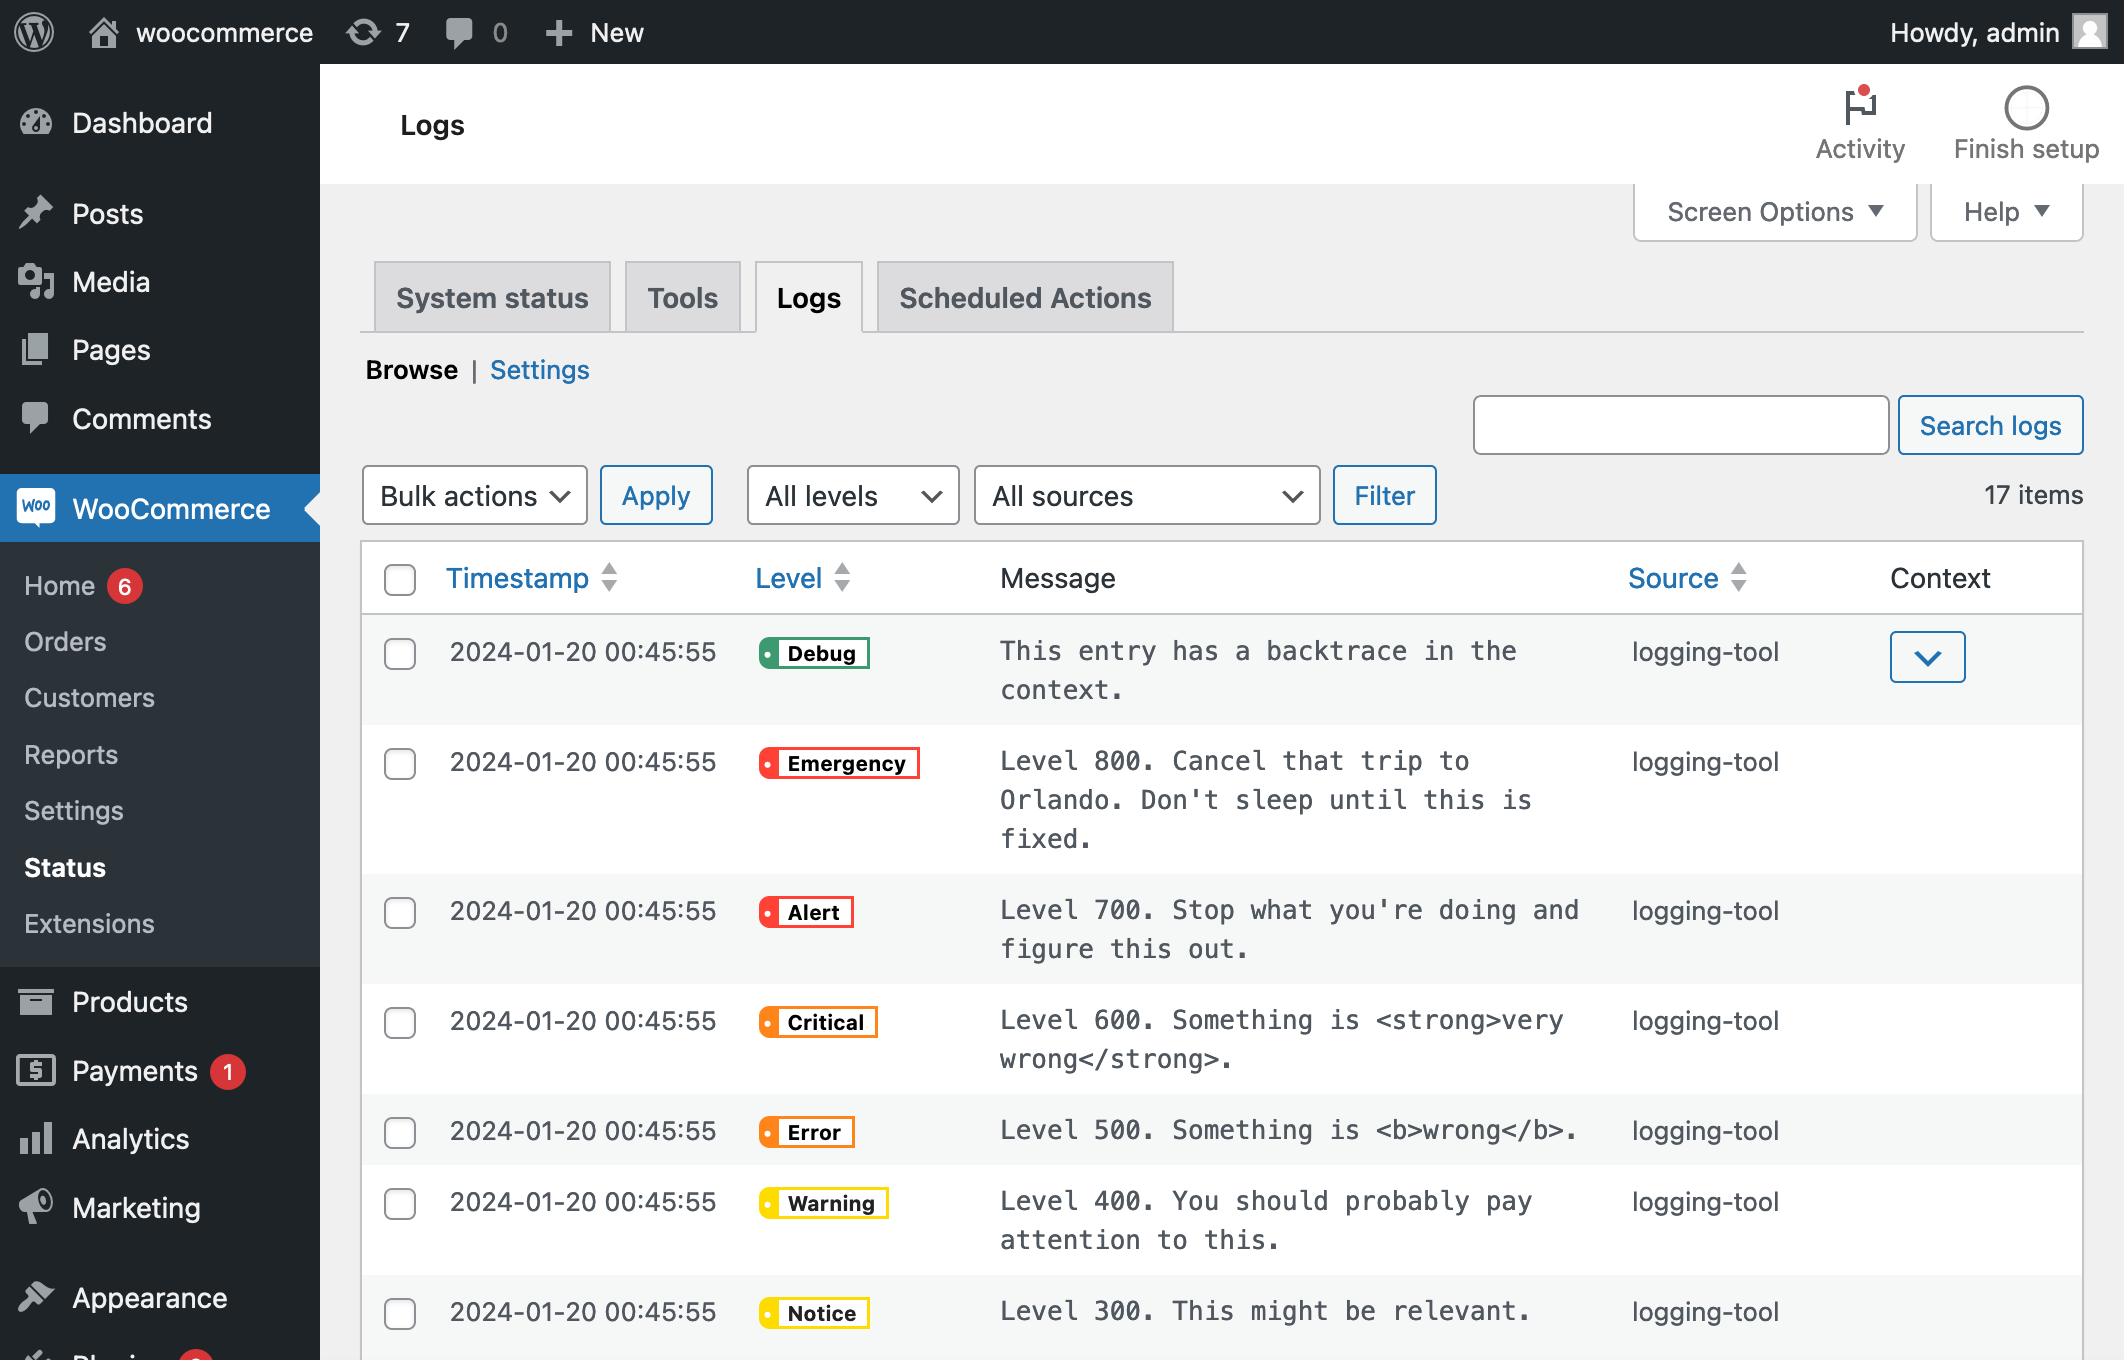
These entries can be sorted by timestamp, level, and source, as well as filtered to only show a particular source or a minimum level. You can also search for a string within the log entry message fields.
Configuring the logger
From the Logs screen at WooCommerce > Status > Logs, click the “Settings” link to make configuration changes:
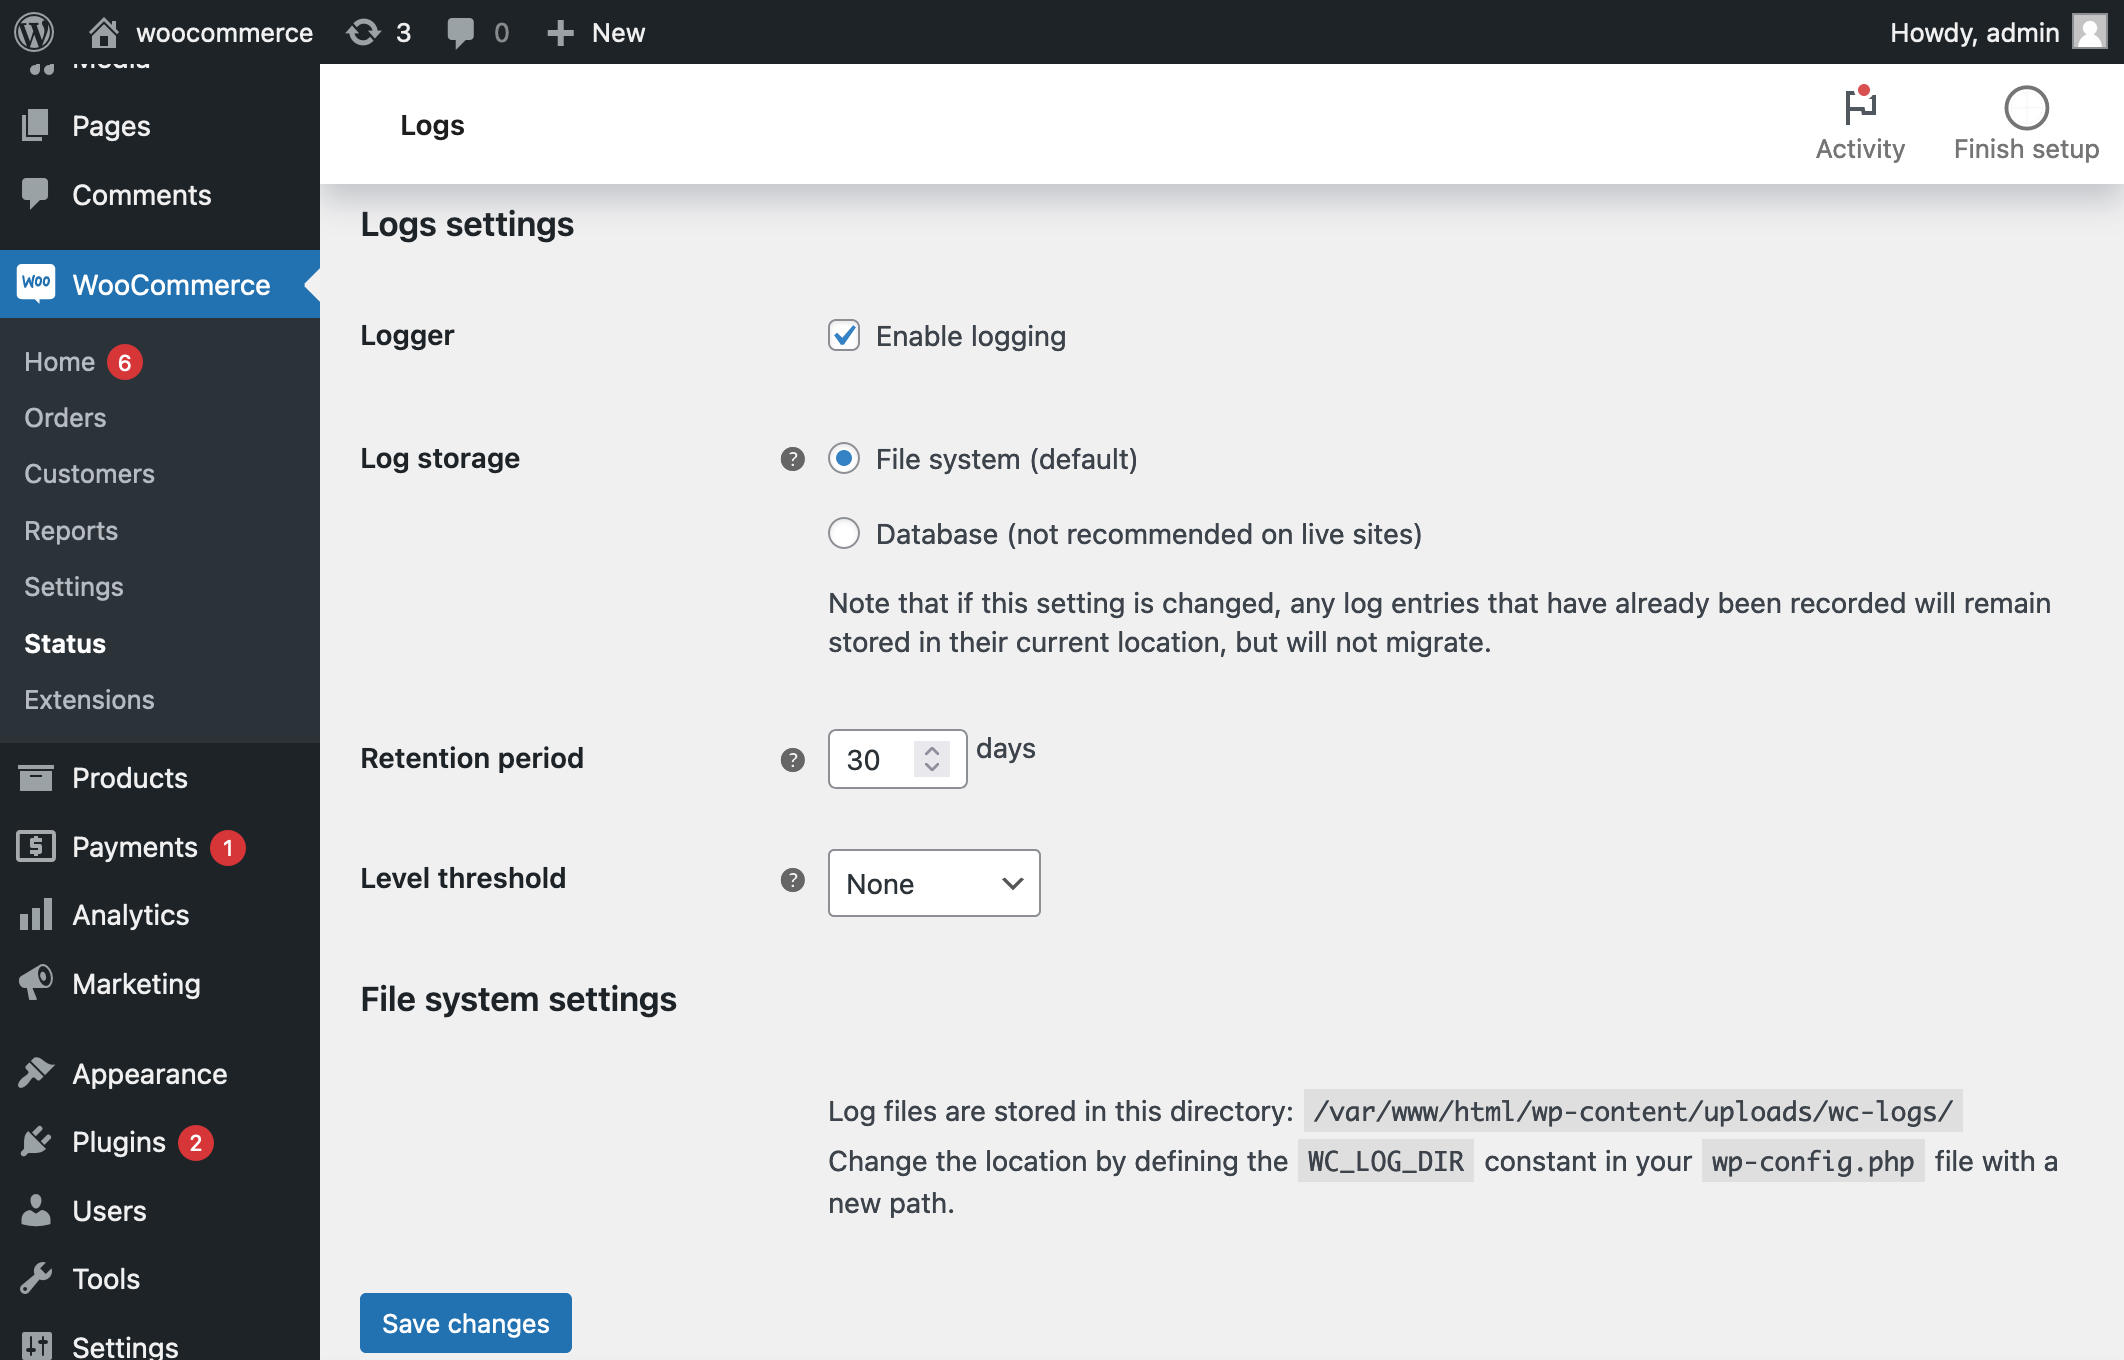
Logger
Uncheck the box here to turn off all logging. This is not recommended in most circumstances, as logging can provide valuable information about what is happening on your site!
Log storage
Out-of-the-box, WooCommerce has two different log storage methods available:
-
File system – Log entries are recorded to files. Files are differentiated by the
sourcevalue for the log entry (see the “Adding logs” section below), and by the current date. The files are stored in thewc-logssubdirectory of the site’suploadsdirectory. A custom directory can be defined using thewoocommerce_log_directoryfilter hook. Log files can be up to 5 MB in size, after which the log file will rotate. -
Database – Log entries are recorded to the database, in the
{$wpdb->prefix}woocommerce_logtable.
If you change this setting, and you already have some log entries, those entries will not be migrated to the other storage method, but neither will they be deleted.
Retention period
The logger will periodically go through and delete logs that are older than this time period, as a space-saving measure. If log entries are stored in the file system, the entire log file that is beyond the retention period will be deleted, while with database storage, individual log entries will be deleted.
Level threshold
Each log entry has a severity level (see the “Adding logs” section below). This sets a minimum severity level, and any log entries that are generated that are not at or above the minimum level will not be recorded. Use this setting with caution!
If this setting is set to “None”, it means that all log entries will be recorded, regardless of severity level.
Adding logs
Logs are added via methods in the WC_Logger class. The class instance is accessed by using the wc_get_logger() function. The basic method for adding a log entry is WC_Logger::log( $level, $message, $context ). There are also shortcut methods for each log severity level, for example WC_Logger::warning( $message, $context ). It is preferable to use the shortcut methods rather than the generic log method.
Level
Logs have eight different severity levels:
-
emergency -
alert -
critical -
error -
warning -
notice -
info -
debug
Aside from giving a site owner context as to how important a log entry is, these levels also allow logs to be filtered. If you only want log entries to be recorded for error severity and higher, you can set the threshold on the Logs Settings screen (see the “Configuring the logger” above).
Note that this threshold will apply to all logs, regardless of which log handler is in use. The WC_Log_Handler_Email class, for example, has its own threshold setting, but it is secondary to the global threshold.
Message
The message is the main content of a log entry. Make sure it’s understandable by anyone who might be viewing the logs!
Context
The context parameter is intended to be used to store additional structured data related to the log entry. For example, in a log entry about an order, you may want to include contents of the related order object. When the logger is generating an entry, the data in the context parameter is converted to JSON before it is stored. So, if you want to add multiple pieces of context data, each should be added as a separate key within the context array.
There are two specific keys that can be added to the context array that will cause special behavior:
source
It is recommended that every log entry include a source value in the context parameter. source is intended to provide context about where in the application or codebase the log was generated, and can be used to filter log entries.
If a source is not specified, the logger will generate a source value based on the plugin or file where the log entry was generated.
backtrace
Setting the backtrace key in your context parameter to true will cause the logger to generate a backtrace (i.e. stack trace) in array format, which will be included in the context in place of the true value. This is useful particularly for error-related logs, so you can see what code was executed that led to the log entry being generated.
Full example
		wc_get_logger()->info(
    'It is time for lunch.',
    array(
        'source'        => 'your_stomach',
        'backtrace'     => true,
        'previous_meal' => $elapsed_time_since_breakfast,
        'lunch_options' => array( 'fridge leftovers', 'bahn mi', 'tacos', 'pupusas' ),
    )
);
Logging best practices
When to use logging
- To help troubleshoot an unexpected problem:
- An unexpected value or error is received from an API.
- Data in the system is incorrect or corrupted.
- The application is in an unexpected or broken state.
- To keep an audit log of a process:
- Transaction details not stored elsewhere, like an order note (but maybe they should be?)
- Results of data import or export.
- An important setting is changed.
- An automated process changes or deletes data.
When not to use logging
- To let a developer know that they’re using a method or API incorrectly. This can lead to a large volume of useless log entries, especially if it will get triggered on every page request. Better to give them immediate feedback in the form of an error or exception (e.g.
wc_doing_it_wrong()).
Best practices
- Rather than using the
WC_Loggerâslog()method directly, it’s better to use one of the wrapper methods that’s specific to the log level. E.g.info()orerror(). - Write a message that is a complete, coherent sentence. This will make it more useful for people who aren’t familiar with the codebase.
- Log messages should not be translatable (see the discussion about this in the comments). Keeping the message in English makes it easier to search for solutions based on the message contents, and also makes it easier for Happiness Engineers to understand what’s happening, since they may not speak the same language as the site owner.
- Ideally, each log entry message should be a single line (i.e. no line breaks within the message string). Additional lines or extra data should be put in the context array.
- Avoid outputting structured data in the message string. Put it in a key in the context array instead. The logger will handle converting it to JSON and making it legible in the log viewer.
- If you need to include a stack trace, let the logger generate it for you.
- Decide on a source for the component or system you are working on and use it for every log call you make. This will make it easier to find all the log entries that are related to the component, and filter them out from other, unrelated log entries.
- Consider adding one log entry after a looped process with the aggregated results of the loop, rather than adding a separate entry during each item within a loop.
Customizing the logger
The logger class
The WC_Logger class can be substituted for another class via the woocommerce_logging_class filter hook. The alternative class must implement WC_Logger_Interface, or it will not be used. Generally it is better to create a custom log handler (see below) rather than overriding the logger class itself.
Log handlers
In WooCommerce, a log handler is a PHP class that takes the raw log data and transforms it into a log entry that can be stored or dispatched. WooCommerce ships with four different log handler classes:
-
AutomatticWooCommerceInternalAdminLoggingLogHandlerFileV2: This is the default handler, representing the “file system” log storage method. It records log entries to files. -
WC_Log_Handler_File: This is the old default handler that also records log entries to files. It may be deprecated in the future, and it is not recommended to use this class or extend it. -
WC_Log_Handler_DB: This handler represents the “database” log storage method. It records log entries to the database. -
WC_Log_Handler_Email: This handler does not store log entries, but instead sends them as email messages. Emails are sent to the site admin email address. This handler has some limitations.
Changing or adding handlers
To switch from the file handler to the database handler, you can simply update the option on the Logs Settings screen. However, in some cases, you may want to have more than one log handler, and/or you might want to modify the settings of a handler. For example, you may want to have most logs saved to files, but log entries that are classified as emergency or critical errors also sent to an email address. For this, you can use the woocommerce_register_log_handlers filter hook to create an array of log handler class instances that you want to use. Some handler class constructors have optional parameters that you can use when instantiating the class to change their default behavior.
Here’s an example of adding the email handler:
		function my_wc_log_handlers( $handlers ) {
	$recipients = array( 'wayne@example.com', 'garth@example.com' ); // Send logs to multiple recipients.
	$threshold  = 'critical'; // Only send emails for logs of this level and higher.
	$handlers[] = new WC_Log_Handler_Email( $recipients, $threshold );

	return $handlers;
}
add_filter( 'woocommerce_register_log_handlers', 'my_wc_log_handlers' );
Creating a custom handler
You may want to create your own log handler class in order to send logs somewhere else, such as a Slack channel or perhaps an InfluxDB instance. Your class must extend the WC_Log_Handler abstract class and implement the WC_Log_Handler_Interface interface. The WC_Log_Handler_Email handler class provides a good example of how to set this up.
Turning off noisy logs
If there is a particular log that is recurring frequently and clogging up your log files, you should probably figure out why it keeps getting triggered and resolve the issue. However, if that’s not possible, you can add a callback to the woocommerce_logger_log_message filter hook to ignore that particular log while still allowing other logs to get through:
		function my_ignored_logs( $message, $level, $context, $handler ) {
	if ( false !== strpos( $message, 'Look, a squirrel!' ) ) {
		return null;
	}

	return $message;
}
add_filter( 'woocommerce_logger_log_message', 'my_ignored_logs', 10, 4 );
The Logs UI
If you create a custom log handler and you want to build a separate interface for it on the Logs screen, there are a couple of filter hooks that you can work with:
-
woocommerce_logger_handler_options: This filter hook allows you to add your custom log handler to the list of “Log storage” options on the Settings screen. Your handler must be selected for this setting, making it the “default” log handler, before you can render an alternative interface for it. -
wc_logs_render_page: This is the action to hook into for rendering your own Logs interface. It only fires if the default log handler is set to something that is not one of the built-in handlers. -
wc_logs_load_tab: This action fires when the Logs tab first starts loading, before any content is output. It’s useful for handling form submissions.
Last updated: April 09, 2024