How to add store management links
Introduction
In the new and improved WooCommerce home screen, there are two points of extensibility for plugin developers that have recently had some attention. The first is the setup task list, allowing you to remind the user of tasks they need to complete and keeping track of their progress for them.
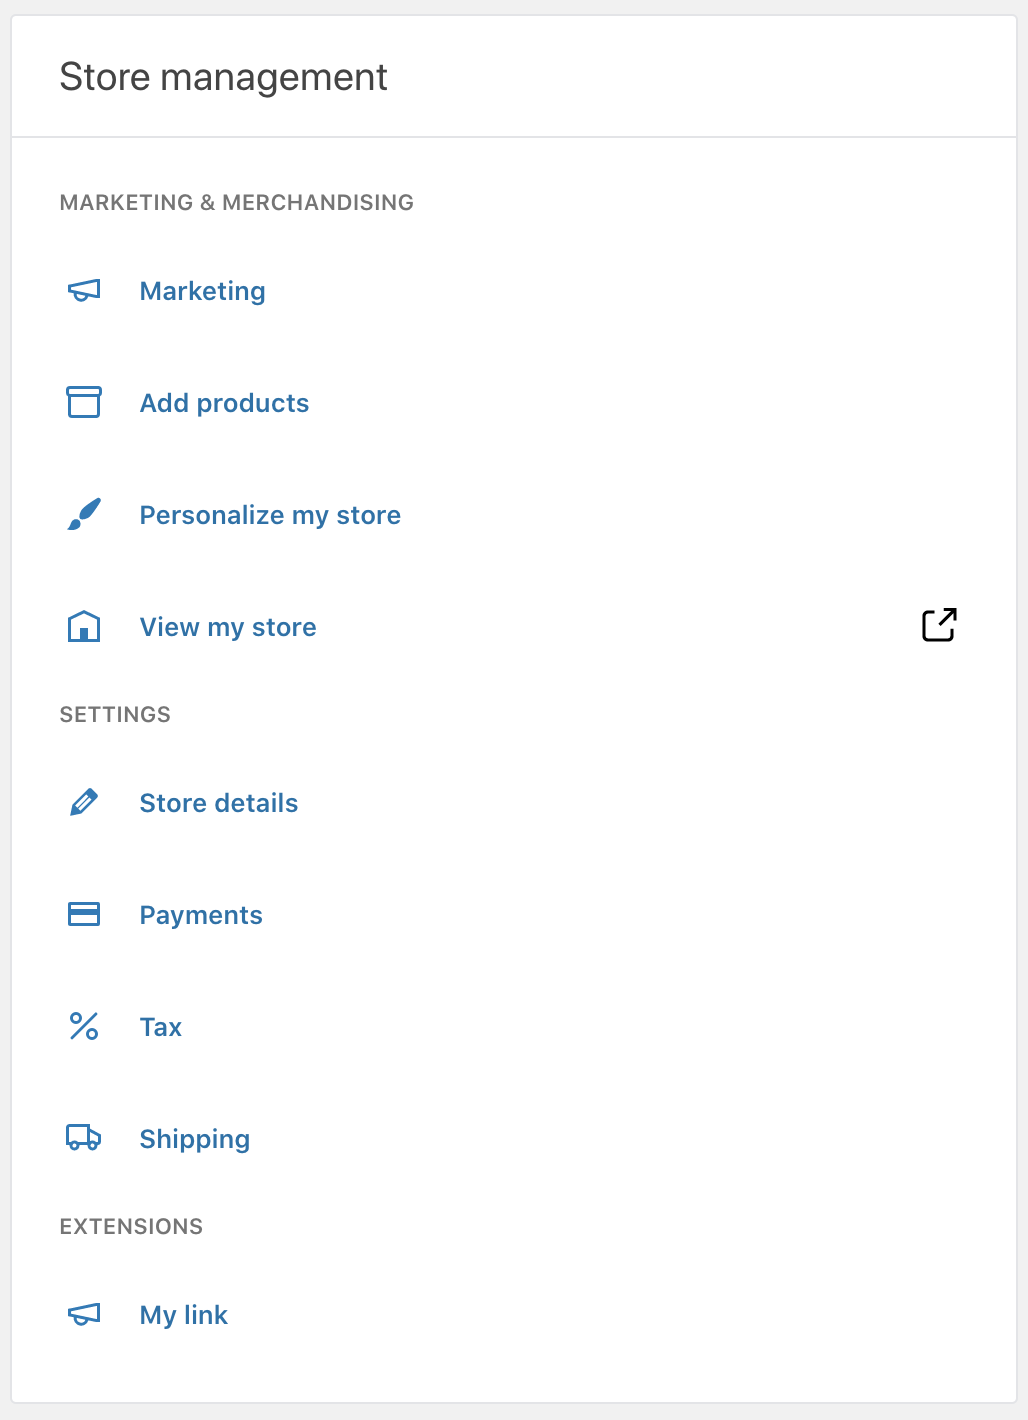
The second is the store management links section. Once the user has completed the setup tasks this will display for them. This section consolidates a list of handy navigation links that merchants can use to quickly find features in WooCommerce.
Discoverability can be hard for users so this can be a great place to bring attention to the features of your plugin and allow users to easily find their way to the key functionality your plugin provides.
Adding your own store management links is a simple process.
Add your own store management link
Before we start, let’s outline a couple of restrictions on this feature.
Right now these links are designed to keep the user within WooCommerce, so it does not support external links.
All the links you add will fall under a special category in the list called “Extensions”. There is not currently any support for custom categories.
With those things in mind, let’s start.
Step 1 – Enqueue JavaScript
Adding a store management link will all be done in JavaScript, so the first step is enqueuing your script that will add the store management link. The most important thing here is ensuring that your script runs before the store management link section is rendered.
To ensure that your script runs before ours you’ll need to enqueue it with a priority higher than 15. You’ll also need to depend on wp-hooks to get access to addFilter.
Example:
		function enqueue_management_link_script() {
    wp_enqueue_script( $script_name, $script_url, array( 'wp-hooks' ), 10 );
}

add_action( 'admin_enqueue_scripts', 'enqueue_management_link_script' );
Step 2 – Install @wordpress/icons
To provide an icon of your choice for your store management link, you’ll need to install @wordpress/icons in your JavaScript project:
npm install @wordpress/icons --save
Step 3 – Add your filter
Your script will need to use addFilter to provide your custom link to the store management link section. And you’ll need to import your icon of choice from @wordpress/icons. Here’s an example:
		import { megaphone } from "@wordpress/icons";
import { addFilter } from "@wordpress/hooks";

addFilter(
  "woocommerce_admin_homescreen_quicklinks",
  "my-extension",
  (quickLinks) => {
    return [
      ...quickLinks,
      {
        title: "My link",
        href: "link/to/something",
        icon: megaphone,
      },
    ];
  }
);
Here’s a screen shot using our new custom store management link:
Last updated: April 09, 2024